
| 일 | 월 | 화 | 수 | 목 | 금 | 토 |
|---|---|---|---|---|---|---|
| 1 | 2 | 3 | 4 | 5 | 6 | |
| 7 | 8 | 9 | 10 | 11 | 12 | 13 |
| 14 | 15 | 16 | 17 | 18 | 19 | 20 |
| 21 | 22 | 23 | 24 | 25 | 26 | 27 |
| 28 | 29 | 30 | 31 |
- visual studio code
- 노션 데이터베이스
- D2Coding
- D2coding 폰트 다운로드
- D2coding 폰트
- Notion
- 전체 페이지 데이터베이스
- 인라인 데이터베이스
- VS Code
- 노션 데이터베이스 전환
- 노션
- 노션 데이터베이스 활용
- 노션 하위 페이지
- 노션 텍스트 블록
Crescendo Code
4월 7일 (금) - [] 본문
◆ 이전 개념 정리
Swing ( WindowBuilder → 소스코딩 ) : 순서에 주의
▶ UI ( View : Pattern (MVC) )
1. 컨테이너 (JFrame)
- resizeable (false)
- contentPane (JPanel)
- Layout Manager ( null / absoute )
2. 컴포넌트 - 균형감있게 배치
- 이벤트
3. 소스코딩
- 이벤트 내부 코딩
▶ Model → jar (실행파일 묶음)
- 분업을 위한 클래스 분할 작업
- DAO (Data Access Object) : 데이터(데이터베이스 파일) 연결 / 처리 로직 메서드화
- (D)TO (Transfer Object) : 데이터 전송
▶ 컴포넌트 종류
JLabel / (JTextArea)
JButton
JTextField / JPasswordField / JTextArea
JCheckBox / JRadioButton
◆ JOptionPane ( 에러 / 옵션 )
Q 1. '메시지' 라는 문구가 출력된 옵션창 띄우기
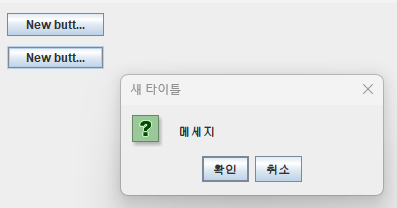
Q 2. 옵션 창의 타이틀 이름을 '새 타이틀'로 변경하고 정보 이미지 출력


public void mouseClicked(MouseEvent e) {
	JOptionPane.showMessageDialog(JOptionPaneEx01.this, "메세지");
}
public void mouseClicked(MouseEvent e) {
JOptionPane.showMessageDialog(JOptionPaneEx01.this, "메세지",
"새 타이틀", JOptionPane.INFORMATION_MESSAGE);
}
Q 1. 버튼을 추가하고 '메시지' 라는 문구가 출력된 확인 옵션창 띄우기
Q 2. 옵션 창의 타이틀 이름을 '새 타이틀'로 변경하고 취소 항목 삭제

public void mouseClicked(MouseEvent e) {
	JOptionPane.showConfirmDialog(JOptionPaneEx01.this, "메세지");
}
public void mouseClicked(MouseEvent e) {
JOptionPane.showConfirmDialog(JOptionPaneEx01.this, "메세지",
"새 타이틀", JOptionPane.OK_CANCEL_OPTION);
}
Q. 버튼의 '확인'을 누르면 'OK 클릭', '취소'를 누르면 'CANCEL 클릭', 'x' 를 누르면 '기타' 메시지를 출력하는 프로그램
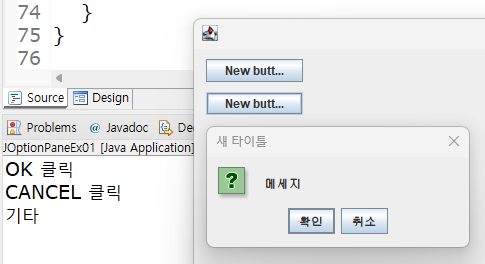
public void mouseClicked(MouseEvent e) {
	int result = JOptionPane.showConfirmDialog(JOptionPaneEx01.this, "메세지",
		"새 타이틀", JOptionPane.OK_CANCEL_OPTION);
	if( result == JOptionPane.OK_OPTION) {
		System.out.println( "OK 클릭" );
	} else if ( result == JOptionPane.CANCEL_OPTION ) {
		System.out.println( "CANCEL 클릭" );
	} else {
		System.out.println( "기타" );
	}
}
Q. 아래 그림과 같이 입력값을 받는 옵션창을 생성하고, 초기값을 지정

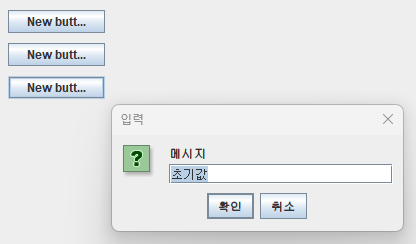
public void mouseClicked(MouseEvent e) {
	JOptionPane.showInputDialog( "메시지" );
}
public void mouseClicked(MouseEvent e) {
JOptionPane.showInputDialog( "메시지", "초기값" );
}
Q. 아래 그림과 같이 확인, 취소, x 버튼 클릭에 따라 출력되는 내용이 다른 프로그램 생성

public void mouseClicked(MouseEvent e) {
	String result = JOptionPane.showInputDialog( "메시지", "초기값" );
	if ( result != null ) {
		System.out.println( "결과 : " + result );
	} else {
		System.out.println( "입력 취소" );
	}
}
- 기본적인 반환 타입은 String이지만, 취소, x를 눌렀을때엔 null값이 반환된다.
Q. 아래 그림과 같이 버튼을 생성 후 클릭하면 에러 옵션창이 팝업되는 프로그램

public void mouseClicked(MouseEvent e) {
	JOptionPane.showMessageDialog(JOptionPaneEx01.this,
		"에러 메시지", "에러", JOptionPane.ERROR_MESSAGE);
}
◆ JProgressBar
- maximum / minimum : 게이지의 최대값 / 최소값
- value : 현재 게이지의 수 ( 위의 최대, 최소값과 연동되어 % 가 계산된다. )
- stringPainted : 현재 % 수치 표시 여부
예제 1. 아래 그림을 참고한 프로그램 작성. 최소값에서 감소, 최대값에서 증가 버튼 클릭 시 에러 메시지 출력
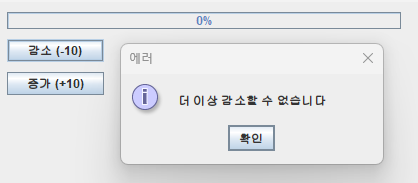

public void mouseClicked(MouseEvent e) {
	progressBar.setValue( progressBar.getValue() - 10 );
	if( progressBar.getValue() == progressBar.getMinimum() )
    	JOptionPane.showMessageDialog(JProgressBarEx01.this, "더 이상 감소할 수 없습니다",
			"에러", JOptionPane.INFORMATION_MESSAGE);
	}
public void mouseClicked(MouseEvent e) {
progressBar.setValue( progressBar.getValue() + 10 );
if( progressBar.getValue() == progressBar.getMaximum() )
JOptionPane.showMessageDialog(JProgressBarEx01.this, "더 이상 증가할 수 없습니다",
"에러", JOptionPane.INFORMATION_MESSAGE);
}◆ JSlider
- minimum / maximum / value : JProgressBar와 비슷한 개념
- majorTickSpacing : 메인 단위로 끊을 수치
- paintLabel : majorTickSpacing 마다 수치 표기
- minorTickSpacing : 메인 간 작은 단위로 끊을 수치
- paintLabel : majorTickSpacing, minorTickSpacing의 지점 표기
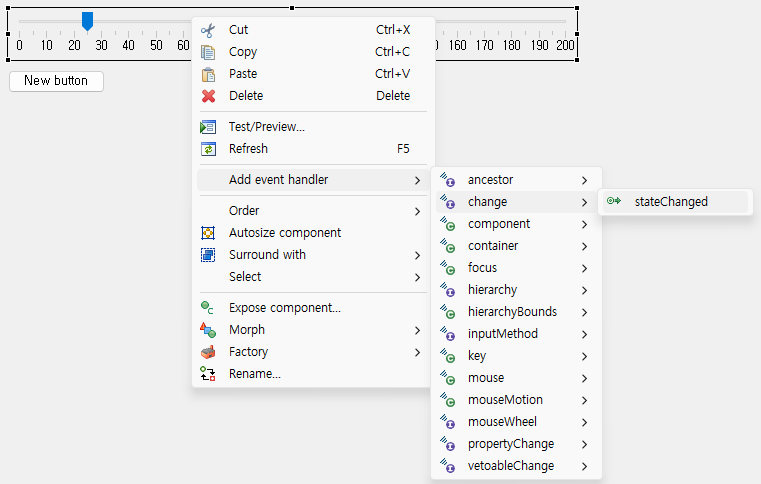
Q. 상태를 추적하는 슬라이드바를 생성 (초기값 주의)

public void stateChanged(ChangeEvent e) {
	if( textArea != null ) {
		textArea.append( slider.getValue() + System.lineSeparator() );
	}
}
- scrollPane.setViewportView(textArea); 의 선언 시점 순서에 따라 소스 코드상에서는 에러가 없지만, 실행시 에러가 발생할 수 있다.
- 값 출력 명령시 초기값도 변동값으로 적용되어 들어가므로, 초기값 적용을 없애려면 소스코드의 setValue() 값을 지우고 실행한다.
예제. 색상 혼합기 프로그램 만들기
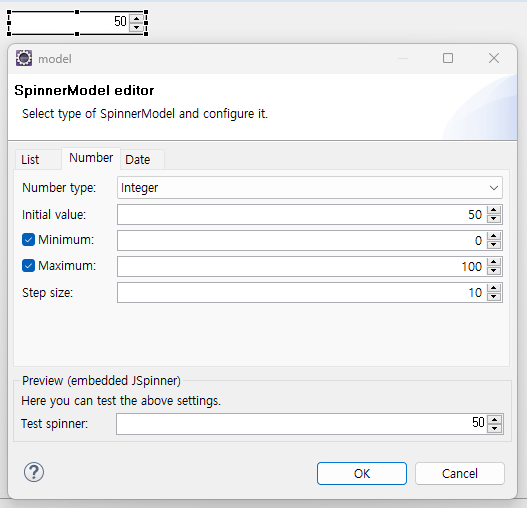
◆ JSpinner
Q. JSpinner를 생성 ( 시작값 50, 최소값 0, 최대값 100, 증가/감소 폭 10 )
Q. 버튼을 생성하고 클릭 시 JSpinner의 데이터 값을 출력하는 프로그램

btn.addMouseListener(new MouseAdapter() {
	@Override
	public void mouseClicked(MouseEvent e) {
		System.out.println( (Integer)spinner.getValue() );
	}
});
- 동일한 코드를 JSpinner에서 stateChanged 생성 후 안에 넣으면 화살표로 값 변동시 데이터 값이 출력된다.
Q.아래 그림과 같은 JSpinner를 생성

Q. 아래 두 코드 분석
import java.awt.EventQueue;

import javax.swing.JFrame;
import javax.swing.JPanel;
import javax.swing.border.EmptyBorder;
import javax.swing.JSpinner;
import javax.swing.SpinnerListModel;
import javax.swing.JButton;
import java.awt.event.MouseAdapter;
import java.awt.event.MouseEvent;

public class JSpinnerEx02 extends JFrame {

	private JPanel contentPane;
	private JSpinner spinner;

	/**
	 * Launch the application.
	 */
	public static void main(String[] args) {
		EventQueue.invokeLater(new Runnable() {
			public void run() {
				try {
					JSpinnerEx02 frame = new JSpinnerEx02();
					frame.setVisible(true);
				} catch (Exception e) {
					e.printStackTrace();
				}
			}
		});
	}

	/**
	 * Create the frame.
	 */
	public JSpinnerEx02() {
		setResizable(false);
		setDefaultCloseOperation(JFrame.EXIT_ON_CLOSE);
		setBounds(100, 100, 800, 600);
		contentPane = new JPanel();
		contentPane.setBorder(new EmptyBorder(5, 5, 5, 5));

		setContentPane(contentPane);
		contentPane.setLayout(null);

		spinner = new JSpinner();

		String [] items = {"사과", "참외", "수박", "딸기"};
		SpinnerListModel spinnerListModel = new SpinnerListModel(items);

		// spinner.setModel(new SpinnerListModel(new String[] {"사과", "참외", "수박", "딸기"}));
		// spinner.setModel( spinnerListModel );
		// DAO와 연결

		spinner.setModel( new SpinnerListModel(new String[] {""}));

		spinner.setBounds(12, 10, 264, 22);
		contentPane.add(spinner);

		JButton btn = new JButton("New button");
		btn.addMouseListener(new MouseAdapter() {
			@Override
			public void mouseClicked(MouseEvent e) {
				spinner.setModel( new CustomSpinnerListModel() );
			}
		});
		btn.setBounds(12, 42, 97, 23);
		contentPane.add(btn);
	}

}
import javax.swing.SpinnerListModel;
public class CustomSpinnerListModel extends SpinnerListModel {
public CustomSpinnerListModel() {
super(new String [] {"사과", "참외", "수박", "딸기" });
}
}◆ JComboBox
- model : 데이터를 넣을 수 있다 ( 타입은 문자열밖에 안됨 )
- selectedIndex : 초기 선택값 ( 인덱스 0부터 시작한다. -1은 선택되지 않은 값 )
Q. 콤보박스로 데이터 선택 후 버튼을 눌렀을 때, 데이터의 인덱스를 출력하는 프로그램

public void mouseClicked(MouseEvent e) {
	System.out.println( comboBox.getSelectedIndex() );
}
Q. 콤보박스로 데이터 선택 후 버튼을 눌렀을 때 데이터 값을 출력하는 프로그램

public void mouseClicked(MouseEvent e) {
	System.out.println( (String)comboBox.getSelectedItem() );
}
public void mouseClicked(MouseEvent e) {
ComboBoxModel model = comboBox.getModel();
System.out.println( model.getElementAt(comboBox.getSelectedIndex()) );
}- 두 가지 다 모두 사용 가능하다.
- ItemStateChanged

public void itemStateChanged(ItemEvent e) {
	// select 상태와 deselect 상태가 동시에 걸려있는 이벤트이므로 조건을 걸어줘야 한다.
	// if 문이 없다면 두 개씩 출력된다.
	if( e.getStateChange() == ItemEvent.SELECTED ) {
	System.out.println( (String)comboBox.getSelectedItem() );
}
◆ JList
- 처음 생성시엔 크기 조절을 위한 선택이 잘 되지 않으므로 Bounds 속성에서 width와 height로 크기 어느 정도 확대한 뒤 드래그로 상세한 크기를 조절한다.
- model : 데이터 입력
- selectedIndex : 초기 선택 항목 지정.
- JList는 보통 scrollPane과 함께 사용하므로 JList의 사이즈를 크게 조절 할 필요가 없다. ( scrollPane의 사이즈를 조절한다.)
Q. 버튼 클릭 시 선택된 데이터 값과 인덱스 출력
- 버튼 생성 후 마우스클릭 이벤트 부여
public void mouseClicked(MouseEvent e) {
	System.out.println( list.getSelectedIndex() );
	System.out.println( (String)list.getSelectedValue() );
}
Q. 리스트의 데이터를 선택할 때 마다 데이터 값 출력. 단, 1개씩만 출력되어야 함.
- ValueChanged 이벤트 적용
public void valueChanged(ListSelectionEvent e) {
	if (e.getValueIsAdjusting() ) {
		return;
	}
	System.out.println( (String)list.getSelectedValue() );
}
list = new JList();
list.addListSelectionListener(new ListSelectionListener() {
public void valueChanged(ListSelectionEvent e) {
if (e.getValueIsAdjusting() ) {
return;
}
System.out.println( (String)list.getSelectedValue() );
}
});
list.setSelectionMode(ListSelectionModel.SINGLE_SELECTION);
scrollPane.setViewportView(list);
// list.setModel(new AbstractListModel() {
// String[] values = new String[] {"사과", "참외", "수박", "딸기", "사과", "참외", "수박", "딸기사과", "참외", "수박", "딸기사과", "참외", "수박", "딸기"};
// public int getSize() {
// return values.length;
// }
// public Object getElementAt(int index) {
// return values[index];
// }
// });
list.setModel(new CustomListModel() );
list.setSelectedIndex(2);
JButton btn = new JButton("New button");
btn.addMouseListener(new MouseAdapter() {
@Override
public void mouseClicked(MouseEvent e) {
System.out.println( list.getSelectedIndex() );
System.out.println( (String)list.getSelectedValue() );
}
});
예제 2. 우편번호 검색기 프로그램 만들기 ( 중앙의 넓은 영역은 JList이다. )

1. MariaDB : user - project / password - 1234 인 사용자 생성
2. project에게 모든 권한 부여
3. project DB 생성 후 zipcode 테이블 생성
create table zipcode (
zipcode char(7) not null,
sido varchar(4) not null,
gugun varchar(17),
dong varchar(26) not null,
ri varchar(45) not null,
bunji varchar(17) not null,
seq int(5) unsigned not null
);
4. zipcode_seoul_utf8_type2.csv 파일의 모든 데이터를 DB zipcode 테이블 안에 추가
import java.io.BufferedReader;
import java.io.FileNotFoundException;
import java.io.FileReader;
import java.io.IOException;
import java.sql.Connection;
import java.sql.DriverManager;
import java.sql.SQLException;
import java.sql.Statement;

public class JDBCEx15 {
	public static void main(String[] args) {

		String url = "jdbc:mariadb://localhost:3306/project";
		String user = "project";
		String password = "1234";

		Connection conn = null;
		Statement stmt = null;

		BufferedReader br = null;

		try {

			Class.forName( "org.mariadb.jdbc.Driver" );

			conn = DriverManager.getConnection(url, user, password);
			stmt = conn.createStatement();

			br = new BufferedReader ( new FileReader ( "./zipcode_seoul_utf8_type2.csv" ));

			String str = "";
			int count = 0;

			while ( ( str = br.readLine() ) != null ) {
				String[] arrZipcode = str.split( "," );

				String sql = String.format ( "insert into zipcode values ('%s', '%s', '%s', '%s', '%s', '%s', '%s')",
						arrZipcode[0], arrZipcode[1], arrZipcode[2], arrZipcode[3],
						arrZipcode[4], arrZipcode[5], arrZipcode[6]);

				stmt.execute( sql );
				count++;
			}

			System.out.println( "실행 완료 : " + count );

		} catch (ClassNotFoundException e) {
			System.out.println( "[에러] " + e.getMessage() );
		} catch (SQLException e) {
			System.out.println( "[에러] " + e.getMessage() );
		}	catch (IOException e) {
			System.out.println( "[에러] " + e.getMessage() );
		} finally {
			if( br != null ) try { br.close(); } catch( IOException e) {}
			if( stmt != null ) try { stmt.close(); } catch( SQLException e) {}
			if( conn != null ) try { conn.close(); } catch( SQLException e) {}
		}

	}
}
5. 우편번호 프로그램 만들기
'KIC 백엔드 수업' 카테고리의 다른 글
| 4월 11일 (화) - [JTree, JDialog, JColorChooser, JFileChooser, JMenuBar] (0) | 2023.04.11 |
|---|---|
| 4월 10일 (월) - [JTable, DAO, TO] (0) | 2023.04.10 |
| 4월 6일 (목) - [JTextArea, JPasswordField, JCheckBox, JRadioButton, DB연동 클래스 분할] (0) | 2023.04.06 |
| 4월 5일 (수) - [UI] (0) | 2023.04.05 |
| 4월 4일 (화) - [] (0) | 2023.04.04 |


